***This post is the fourth of a series discussing the importance of shooting and developing a good shot.
- Read Part I explaining shooting’s value in modern basketball.
- Read Part II to learn how important your legs are to shooting.
- Read Part III to see what I consider essential shooting principles.
First, some philosophy to start the day.
Shooting a basketball is not simply technique – like some set of instructions you can read and execute. It is also an art. A reflection of what we see, feel, and understand.
As we will explore in the next article, this is especially true with our hands and fingers. We intuitively hold and shoot a basketball in a certain way. We then use knowledge (ahem, these articles) and practice to hone this response – the same way a painter learns to use certain brush strokes or mixes of colour to convey their own creativity.
Shooting mechanics are a physical expression of the connection between how our individual bodies operate and how we each cognitively understand the process of shooting a basketball. With many the odd tinker and adjustment along the way.
That is why you see the greatest shooters in the world with totally different styles. Each has unique bodies and individual expressions.
Thus, the ideal shooting form is only that which is ideal to you.
Whew. I’m sweating from all that deep thinking. But don’t worry.
Today’s topic – arms – is a more straight-forward discussion…I hope.
Our arms – and legs to some degree – are the mechanical part of the basketball shot. They function as the transition point between catching the basketball to aiming and shooting it.
Their movement creates momentum and power that drive our shot towards the hoop. They also impact accuracy and fluidity. If aligned with our bodies, our arms keep the ball traveling in ONE MOTION on a straight path.
Do it right and your stroke feels like a hot spoon scooping ice cream.
Do it wrong and you’ll go medieval like a trebuchet – seriously check these things out.
Remember, though, as you read through this, these are only suggestions. You will need to get into a gym and test it all out yourself.
Okay, let’s talk arms.
1. Where to Start with Your Arms – The Starting Pocket
The Starting Pocket is where we enter into our shooting motion.
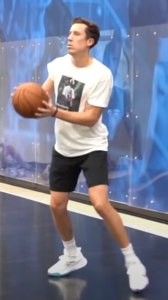
It’s a shooter’s choice on where the Starting Pocket can be. Some have it at the shooting hip or shooting-side of the stomach or even below the hip (to get more range). You can also have the ball closer to or further from the body depending on how your shot flows into its Shooting Path (more on that below).
I start above my shooting-side hip close to my body because I can get my shooting elbow in line with my body right away (some players cannot as I will explain) and I use my legs for the bulk of my shot’s power shortening the path my shot travels.
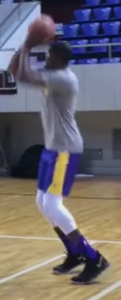
Steph Curry’s Starting Pocket is quite low.
![]()
![]()

Devin Booker’s is a bit higher.
Duncan Robinson’s is a little closer to his body and at his hip as he catches the ball and settles into his Starting Pocket.
Hint: Some players, like Booker does above, lock their shooting wrist as soon as they get the ball in their Starting Pocket making the shooting motion faster and more fluid.
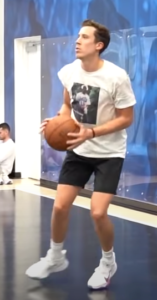
2. Where to Start your Shot – The Shooting/Lift Pocket or Set Point
The Shooting Pocket – as I call it – is where we initiate our shot’s release and send the ball forward.
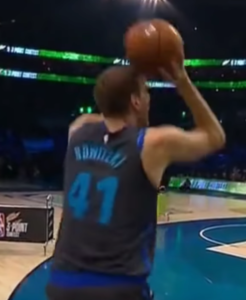
Every person’s Shooting Pocket will be different. Some have it very low and some very high. Traditionally, players are encouraged to have the Shooting Pocket high – like Dirk Nowitzki – because it is difficult to block. But we have seen that many excellent shooters have a low Shooting Pocket too – so long as their form is quick and smooth.
When we are younger our Shooting Pocket tends to be lower to get strength. As we age and get stronger, it migrates upward.
The “ideal” shooting pocket is above your chest where your flexed shooting hand is in line with your eyebrow. From there you can lower if you need more strength or raise it if you can still get it off easily.
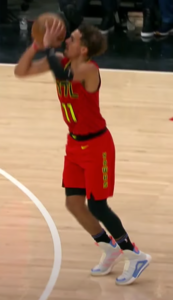
Now, I say “ideal” because it depends on your strength and your body’s mechanics. Look at where Trae Young shoots the ball (lower down) versus Kevin Durant (higher up).
This a consequence of size, strength, and what feels natural to them.
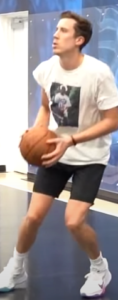
3. How to Move Your Arms – The Shot Path
The Shot Path is the path the ball takes on its way to its release. Surprise, surprise, each shooter has their own Shot Path.
Some have a more straight up and down motion. But one Shot Path used by many shooters, and encouraged by ShotMechanics Crew, is the S-Curve. With an S-curve Shot Path, the ball travels from your Starting Pocket to in front of your body and then back to your Shooting Pocket and up to the release. The S-curve has a natural cyclical motion to it which enables shooters to build momentum and flow into their shot. Similar to how a pitcher winds up by bringing their leg up and arm back before following through to throw a pitch.
Check out Kevin Durant’s and Klay Thompson’s Shot Paths below. Or, for a better analysis of NBA players’ Shot Paths, check out LoopBasketballTraining’s video.
4. Where to Put Your Shooting Arm
In our Shooting Pocket, we ideally want our elbow perpendicular to our body – in line with our knee and wrist and hand – and facing directly towards the hoop. This allows our hand to get under the ball and for our pointer and middle fingers (the fingers that create the backspin) to be the ones shooting the ball on our follow-through.
We do not want our elbow inside the frame of our body or sticking out super wide like a flapping chicken wing. If the elbow points too far out or in, our release will follow that direction and launch diagonally or with sidespin (badddd news).
Hint: When you catch the ball have your shooting elbow tap your hip or rib cage to bring it in line.
Double Hint: Some shooters lack the wrist flexibility to get their hand completely under the ball. If so, you can start to edge your elbow outwards until your hand is comfortably in place. Your elbow can protrude so long as when you follow through your hand and arm are straight and facing towards the basket.
Triple Hint: You can also tighten your shooting elbow by turning your feet slightly away from your shooting arm. This allows your arm to more naturally align with your body. Your elbow might also be popping out because of where your shooting hand is placed on the ball. We will get into that next article.
5. What to Do with the Non-Shooting Arm/Guide Arm
Your guide arm or shooting arm is Steady Eddy. You plant your hand on the side of the ball and let your shooting arm do all the bossing around. We’ll get to its hand position next time.
That was a lot to take in. And a lot to think about in a shot. The irony is that so much of this is what feels right to you – as I have said all along.
The best thing for you to do is to use these principles as a measuring stick. Go into the gym. Try them out. See what feels easy or weird. Register where your shots end up. Are they long, short, left, right? Adjust parts of your form to see what helps.
No matter what: TRACK YOUR PROGRESS. That way you will see over a course of time if your chosen shooting form is the right one for you.
Let your creativity go to work.
After all, basketball is both a science and an art.