***This post is the sixth of a series discussing the importance of shooting and developing a good shot.
- Read Part I explaining shooting’s value in modern basketball.
- Read Part II to learn how important your legs are to shooting.
- Read Part III to see what I consider essential shooting principles.
- Read Part IV exploring the shooting motion and what to do with your arms.
- Read Part V to figure out where your hands go.
Congratulations.
You did it. Your quest’s end is near (…or has just begun…[MIND EXPLOSION]).
You’ve arrived at the final piece. If this is the first article for you, you mayyyyy want to start back at Part I.
If you have read every article thus far, then I can only assume you’re smoking scrimmages and making it rain in drills.
If not, all good. There will be plenty of time to get in the gym and go to work.
Still, there is one final piece. The finishing touch – fittingly – for both this compendium and for your shot.
Fingers may seem like an afterthought to all the complex movements of a basketball shot.
But they are the last part of your body to touch the ball. They are like the final edit of that big essay due first thing in the morning or that last coat of polish on your brand new car. Can’t give up now. If it’s not done right, everything else was for nought.
Our fingers make sure the ball travels straight and puts spin on the ball, which as discussed last article, is what makes your shot soft and smooth. Or as we say on the courts…pure.
Fingers (Holding the Ball):
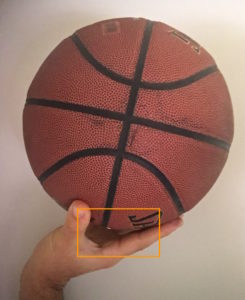
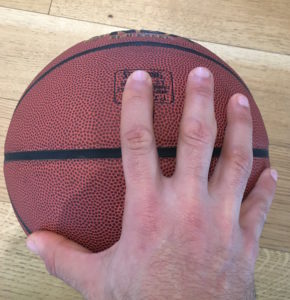
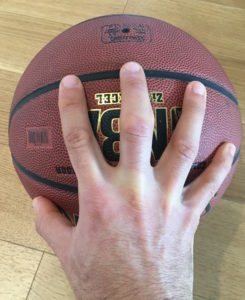
First and foremost. We want to hold the ball in the pads of our fingers. I see a lot of shooters with the ball sitting in the palms of their hands, which is how pitchers throw knuckleballs. Definitely not what we want from our shot.
Our finger pads give us more control over the ball and more strength and accuracy in our release. Its the difference of eating food with your nose plugged or not. You can eat it, no problem, but you won’t enjoy the different flavours of the dish.
Same with a shot. You can get the rock at the rim, sure, but it will be a lot harder to score without your fingers’ sweet sugary touch.
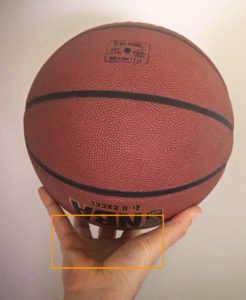
Test: Put the ball in your shooting hand and hold it up like you are about to take a shot. If there is about one to two finger’s width of space between your hand and the ball…perfect! If there is no space, raise the ball a bit more, if there is too much space lower it.
Fingers (The Release):
Here’s where things get a bit tricky. The hands and fingers create a chicken or the egg dilemma (in case you really want to know).
The way you release the ball with your fingers will tell you which way you’ll want to hold the ball. But the way you hold the ball makes it easier to follow through with certain fingers.
What matters is what’s most comfortable. Look at the different combinations I outline below to see what works best. You may also want to re-read the article discussing hands to get an idea of how holding the ball impacts our shot.
Whatever finger(s) it ends up being – we’ll discuss all that – we want that finger at the centre of the basketball when beginning our shot. If it is not, then the ball’s going to be more useful building a chimney than getting us a hoop.
Once you figure out what finger you follow through with, you can then play around with hand alignment.
Test: When you shoot and follow through, which finger is pointing towards the ground? Your pointer finger, your middle finger, or both?
1. Pointer/Index Finger
If only your pointer finger finishes down, then it is likely that having your hand behind the ball in your Starting Pocket will be most comfortable for you.
Hint: When holding the ball, your pointer finger should be at the centre of the basketball or just about where the valve is. Of course, it is ideal to have your fingers in the grooves of the basketball – so I’ll show you both.

2. Middle Finger
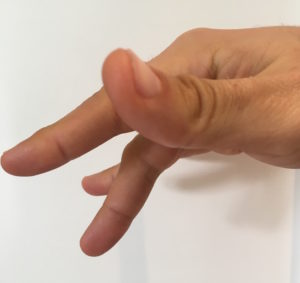
If your middle finger is the last finger to touch the ball in your release, you will likely feel most comfortable having your hand on the top side of the basketball or rotated all the way down to the side in your Starting Pocket. Again, you can see the different ways to hold a basketball in the previous article.
Hint: When holding the ball, your middle finger should be at the centre of the basketball or just about on the valve.
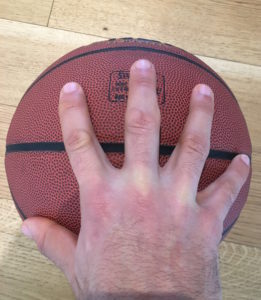
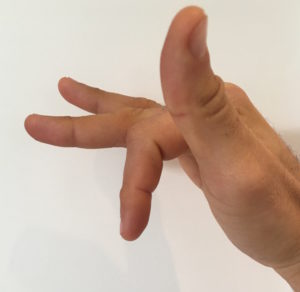
3. Both Fingers (AKA “Split Finger Release”)

If both fingers finish last on the release, then you will probably prefer having your hand further in front of the ball or to the back and side when in your Starting Pocket.
Hint: You are more likely to use both fingers if they are similar in length.
It is difficult for most players to get their hand directly under the ball when using the Split Finger Release because getting the centre of the basketball between the “V” of your two fingers often forces the wrist to turn. By starting in front or to the side, players slide their hand under the ball during their shooting motion bringing their two fingers in.
Hint: When holding the ball in your Starting Pocket, the “V” formed by those two fingers should be at the centre of the basketball with the valve in the middle.
Hint: If possible, end your follow-through with your two fingers pointing down and your ring finger and pinky finger up or straight (as seen above), this will relieve tension in your wrist.


Figuring Your Shot Out
Like I have said alllll along, nothing is set in stone. You need to try all these different combinations and see what works for you. Test them out in shooting drills and track them to see what feels right and brings the most success.
Test: When you catch the ball into your Starting Pocket, where does your hand naturally sit? Behind, in front of, to the side, or on top of the ball (hopefully not this last one)? That may tell you where to naturally start.
Hint: Film yourself shooting and take a look at your entire shooting motion to get a better idea of what you do right and wrong.
Putting it All Together
This series of shooting articles has been a long haul, I admit.
I also confess: basketball is not supposed to be so much reading!
Alas, there is a lot of technical detail involved. And at some point, it does require analytical thinking. To me, that’s part of the sport’s allure.
There are some players who find the game naturally. Who, like, just, suddenly, have a killer jumper. I, too, envy them.
For the rest of us unlucky folk, we need to study the game and think about each aspect thoughtfully and with a critical eye. Especially with shooting, where the slightest tweak or bad habit makes us look more like this than like this (I could actually watch the full hour of that).
But lucky for you, I have done a lot of the initial research. Take what you learn in these six articles and apply them in practice.
Analyze yourself. Be kind, but be meticulous and honest. Ask difficult questions: Are you doing something because it feels easy or because it gets you buckets? Are you working hard enough to change bad habits? Are you doing everything you think you should be doing and it still isn’t working? Depending on the TRUE answer, you’ll know what you need to do next.
Either way, the best way to start change is to set immediate goals for yourself. 500 shots a day. Boom, go get it. Missed 499 of them. Next day same thing. 498. Great, improvement! Go again. And again.
Over time, if you are still not seeing results, then reach out to people like me or your coaches who will happily help you break down your shooting mechanics even further. Or check out shot doctors’ videos online like ShotMechanics to get better visuals.
There is always light at the end of the tunnel. No shooter is hopeless. It just requires that special sprinkle of ingredients: consistent mechanics, a lot of patience, and many, many, many hours of hard work.
May you find that elusive swish in your quest to becoming a great shooter.